
Goodbye Secrets — Using Managed Identity in Dataverse Plugins.
Learn how to securely connect your Dataverse plugins and custom APIs to Azure resources using Managed Identity — without touching a single client secret.

🔐 Still relying on client secrets in your plugins?
You’re not alone. One expires—buried deep in config or environment settings—and suddenly, you’re firefighting downtime. You patch it, it works… until the next time.
There’s a better way: Managed Identity (MI) with Federated Identity Credentials (FIC). No secrets. No rotation. No surprises.
Let me show you how to set it up—step by step.
⚙️ What You’ll Need
Azure subscription (for creating a User Managed Identity — UMI)
Dataverse environment where your plugin or Custom API runs
System Administrator role (to create Managed Identity records)
Entra ID App Registration (to hold the FIC)
XrmToolBox with the REST Builder plugin (to simplify record creation)
📘 Reference: Microsoft Learn — Set up Managed Identity in Dataverse
🪪 Step 1: Create a User Managed Identity in Azure
Run:
az identity create --name dataverse-plugin-mi --resource-group my-rgNote down:
Client ID
Object ID
Tenant ID
You’ll use them in Dataverse next.
🗂️ Step 2: Register the Managed Identity in Dataverse
I find XrmToolBox → REST Builder much easier to work with :)
Connect to your Dataverse environment
Open Dataverse REST Builder → choose
POST/CREATE→ entity namemanagedidentity.Select the columns and provide the values as below:
{
  "applicationid" : "<applicationId, or ClientId on Entra", //I recommend using User Managed Identity
  "credentialsource" : "2" // Managed client,
  "subjectscope" : "1" // You can use devOnlyScope usually you would use EnvironmentScope
  "tenantid" : "provide your tenant Id"
}
Click Execute → the record is created
💡 REST Builder automatically handles OAuth headers.
I always recommend reviewing the EntityType Schema. Here’s the link for ManagedIdentity Table.
To learn how to use Dataverse Rest Builder, review the project website. Personally, I love XrmToolbox because of how easy it is to use. But you can always create records using Power Platform CLI.
If you are planning to use Power Platform CLI, do make sure to setup authentication. That will make it easier to interact with CLI. Here’s the link for pac auth command.
🔗 Step 3: Add a Federated Identity Credential (FIC)
The FIC links Microsoft Entra ID, your plugin, and the Managed Identity.
You can:
Add it manually in the Azure Portal → App Registration → Certificates & Secrets → Federated Credentials
Or automate it with PowerShell:
az ad app federated-credential create `
  --id <app-registration-client-id> `
  --parameters fic.json
⚙️ Automate FIC Creation (optional)
param(
    [string]$AppId,
    [string]$TenantId,
    [string]$subjectIdentifier,
    [string]$Name = “dataverse-fic”
)
az login
$json = @”
{
  “name”: “$Name”,
  “issuer”: “https://sts.windows.net/$TenantId/”,
  “subject”: $subjectIdentifier,
  “audiences”: [”api://AzureADTokenExchange”]
}
“@
$tmp = New-TemporaryFile
$json | Out-File $tmp
az ad app federated-credential create --id $AppId --parameters @$tmp
Remove-Item $tmp
Run once per environment. Example fic.json that you can create and use with Azure CLI.
Here’s the official documentation to understand the Subject Identifier.
{
  "name": "dataverse-fic",
  “issuer”: “https://login.microsoftonline.com/{tenantID}/v2.0”,
  “subject”: “<generate subject identifier>”,
  “audiences”: [”api://AzureADTokenExchange”]
}
🚨 Heads-up: the next post dives into plugin signing with NuGet—don’t miss it.
🧩 Step 4 – Associate the Managed Identity Record with Your Plugin Assembly or Package
At this point you have:
A User Managed Identity in Azure
A Managed Identity record in Dataverse (created in Step 2)
A plugin assembly already registered
But Dataverse still doesn’t know which plugin assembly should use which managed identity.
We’ll do this with XrmToolBox → REST Builder.
What we’re doing
We will send:
PATCH/UPDATE /api/data/v9.0/pluginassemblies(<PluginAssemblyId>)Body:
{
  “managedidentityid@odata.bind”: “/managedidentities(<ManagedIdentityGuid>)”
}
That single PATCH is what turns on managed identity for that plugin. Follow the steps below:
Open XrmToolBox and connect to your Dataverse environment.
Open REST Builder.
In the top, select:
Method:
UPDATEURL / Entity:
pluginassemblies(<PluginAssemblyId>)
To get
<PluginAssemblyId>:Use REST Builder first with a
GET pluginassemblies?$select=pluginassemblyid,nameto find it.
In the Body section, you will see below once your have provided your managed identity ID:
{
  “managedidentityid@odata.bind”: “/managedidentities(<ManagedIdentityGuid>)”
}
Replace
<ManagedIdentityGuid>with the GUID of the managed identity record you created in Step 2. (You can get this the same way —GET managedidentities?$select=managedidentityidin REST Builder, or just run that in your browser if you are logged in to the organization.)Click Execute.
If the PATCH succeeds, your plugin assembly now has a managed identity bound to it.
🧠 Step 5: Use IManagedIdentityService in Your Plugin or Custom API
Now your plugin can request a token for any external API securely.
var miService = (IManagedIdentityService)serviceProvider.GetService(typeof(IManagedIdentityService));
var token = await miService.GetAccessTokenAsync(”https://api.coolapi.com/.default”);
client.DefaultRequestHeaders.Authorization = new AuthenticationHeaderValue(”Bearer”, token);
That’s it! No secrets, no rotation.
📊 Step 6: Monitor the Flow
Plugin Trace Logs
Enable “All” logging under Plugin Trace Settings.
Add logger calls like
logger.LogInformation(”Requesting token...”);Filter for
YourPluginTypeto confirm activity
I highly recommend enabling application insights. You can read more about it here.
Application Insights
Enable dependency tracking
Use a Kusto query like:
dependencies
| where target contains “api.coolapi.com”
| order by timestamp desc
Two entries (login.microsoftonline.com and your API) mean token and call both succeeded.
🧰 Troubleshooting
FIC missing → Token request fails → Create FIC in App Registration
FIC mismatch → 401 or null token → Ensure subject matches the requirements.
Unauthorized → Wrong audience → Use https://api.coolapi.com/.default
External API denied → Token works but API rejects → Grant the UMI permissions in Azure or Easy Auth.
🧠 Check Microsoft Entra ID AD → Sign-in Logs → filter by App Registration to see failed token exchanges.
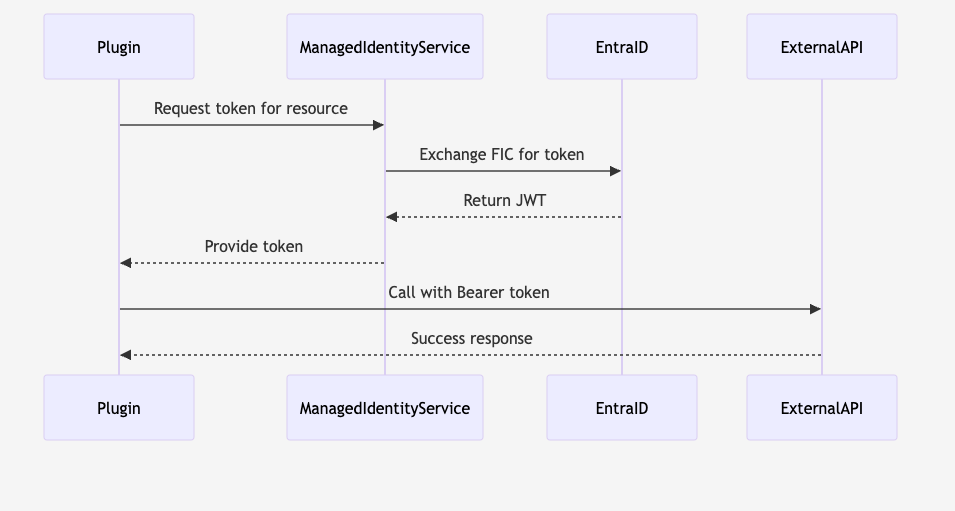
🧪 Behind the Scene
🚨 Quick Checklist
Managed Identity record exists in Dataverse
Audience is
api://AzureADTokenExchangePlugin trace shows token retrieval
External API returns 200 OK
App Insights shows dependency telemetry
🧾 Summary
1️⃣ Create User Managed Identity in Azure.
2️⃣ Register it in Dataverse (via REST Builder).
3️⃣ Add Federated Credential in App Registration.
4️⃣ Use IManagedIdentityService for token access.
5️⃣ Monitor with trace logs and/or App Insights.
6️⃣ Troubleshoot with FIC and Azure logs.
🎯 Final Thoughts
Most tutorials end when the code compiles.
In production, the real success is visibility — knowing when the token request worked and when it didn’t.
By combining:
Microsoft’s official setup steps
XrmToolBox REST Builder for speed
Application Insights for observability
Clear FIC troubleshooting patterns
…you’ll build secure, secretless integrations that actually last.
💬 Enjoyed this guide? Subscribe for more Power Platform deep dives — covering Dataverse extensibility, telemetry, and real-world supportability engineering.